Showing posts with label how-to. Show all posts

Thursday, February 11, 2010

Easy Peasy Valentine Card/Mini Album from Cardstock Scraps!

First off, let me apologize for these less than stellar pics...I've been experimenting with the settings on my camera and somehow changed something and can't figure out what! Anyhoo, I fell in LoVe with this eco-friendly Kenner Road tutorial , which uses cardstock scraps to create a quick mini album, and you will too!
I adored it so much that I adapted it for Valentine's cards this year. All you need to do is cut your cardstock cover to the size that you desire...My card books are 6 x 6 and 5 x 8 inches.
Then gather your cardstock scraps, cut them into rectangles (different sizes work well!) and fold them in half. Stitch the spine of your book to hold it all together and it's ready for you to add pictures, journaling and embellishments!
Gabrielle Pollaco's beautiful blog, Such a Pretty Mess, inspired this flowered heart. I found this scrapbooking goddess on my beloved 2 Peas in a Bucket Gallery. To make the heart, I hot glued prima paper flowers to a heart I cut from pink adhesive-backed felt.
The different-size pages make the layout fun!
For this cover I tore strips of paper and cardstock and stitched them to the front.
I love tall, skinny cards!
Posted by Picasa

Sunday, May 24, 2009

Craft Fair Tips for Papercrafters

Ensure your packaging has your shop name/url on it


Just getting your feet wet with craft fairs? Here are some thoughts and insights I gained from my recent multiple-day fair experience.

  • The 1st tip, unfortunately is, stay away from venues that are not specifically geared towards "handmade". While the press release for this event called for "handcrafted vendors", out of the 12 booths onsite, only 4 of us actually made what we were selling. I ended up next to the lady who sells really inexpensive mass-produced jewelry at one of the local flea markets, whic is exactly what the fairgoers were interested

  • So, how do you find out info on upcoming shows in your area? There are many online eventlister services, some are free and others provide you a list of fairs a few months in advance for a membership fee such as Eventlister. Your local Etsy Street Team will probably also have a list on their blog or forum. Start looking early, at least 2-3 months in advance as some shows have a fairly large list of established vendors and are very competitive to be selected for. For example, applications for Ft. Bragg's November Yule Mart go out in the summer and are usually due by September.
  • When choosing a venue, seek as much info as possible about the fair, ie., is it new? Been around for several years? Is there an admission price for fairgoers? Will there be onsite concessions? All of this will affect your potential sales, especially in this economy.


  • If possible, set up your booth in advance, either in your yard, or wherever you have space (I used my living room) and take pictures to facilitate quick set-up at your event. Be creative with your booth, afterall, it's HOW your booth looks that will draw people in. Look around the house for interesting items, like baskets, picture frame stands, you can use for display. Use on-hand items like boxes hidden under your tabloth to create "risers" or heighth on your table. Check out Etsy for great banners, design your own (with cardstock and vinyl lettering that you can have laminated) or take advantage of free offers from internet marketing companies like Vistaprint. I use their free rubber stamps to stamp the back of all my cards. For smaller items, I print my shop info on a mailing label and adhere it to the outside of a clear resealable bag. Business Cards with a punched hole can also be tied to bags and larger items.

  • Draw more attention by offering freebies or having a drawing to win some of your wonderful goodies. Use up those scrapbook paper remnants by creating little matchbook notepads. Sometimes I enter people in the drawing just for signing up on my email listing (have a clipboard set up for this and one for custom orders too).

  • Set up a Make N' Take Station. Big Kids as well as wee ones enjoy craft-making so why not set aside a little space to let them make a card on the spot. Since the fair opened just before Mother's day, I assembled several card kits from leftover paper and cardstock and sold them for $2.00. I printed out various Mother's Day sentiments on cardstock and let the kids choose their desired phrase. Be sure to advertise your station and the price for making the craft.


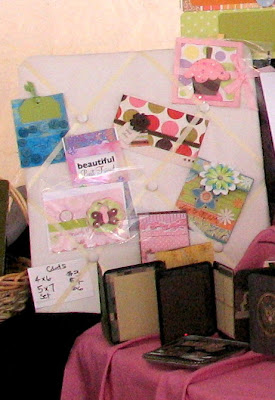
  • Photo Memory Board came in handy to protect against wind.
    Elevated photo trees make an eye catching dislay

  • Prepare for varying whether conditions. We had to contend with rain and strong winds, either could spell catastrophe for our fragile papergoods! Relied on this memory board to keep cards from being blown away. I displayed cards with a greeting inside on this board. I hung blank cards in clear resealable bags (to protect fragile ones from too much handling) from this photo "tree". Don't forget to snap pics of your booth for future craft fair applications if needed.
Memorable experinces? Please share! For more great tips, check out Etsy's blog, the Storque and happy fair-going!

Saturday, March 28, 2009

Handmade Baby Shower Essentials

Need some fresh, new ideas for a baby shower?

1. Opt for a "destination" shower:
My girl, Kelli, and I hosted one for a really sweet friend of ours today. Like me, she's having her 3rd baby and didn't really want a traditional shower with a lot of people; so we went for something more intimate and held it a cute little tea house, McDuff's Team Room and Emporium. It saved me on time and money because I didn't have to clean my house or buy and prepare all the food, decorations etc.


2. Focus theme on the guest of honor:
Instead of a baby-centric theme, we wanted this luncheon to be all about the mommy-to-be, so I went with this cute, but stylish pregnant lady because she fit Julissa to a T! Little bitty arms and legs and nothing but belly! Create your own invitations to match your theme. Need a little help in the wording department? Try Birth Announcements Galore for free ideas.


3. Handcraft or buy a handcrafted gift:
I wanted to have as much of the shower items made by hand as possible, so I purchased this beautiful diaper cake from my lil sis Aisha over at Gifts for All NC. For the DIYers, here's a tutorial for making your own: http://cinnamonspicecrafts.blogspot.com/2008/04/baby-shower-bliss.html


4. Create a babyshower keepsake book:
And I made my first babyshower memory book, where there's room the invitation, for photos and a place for each guest to write a message to the mom-to-be. I blinged it up a little and I think it turned out well. I am so lovin' the brown, green and pink "Spumoni" colors!


5. Give the guests party favors they can eat or will actually use! Let's be honest, sometimes we leave the shower with some cute baby-oriented momento that we'll never use again... I used take-out boxes and accented them with the expectant lady, a circle tag stamped thanks, curling ribbon and color-coordinated satin ribbon. I filled them with hershey's kisses.


6. Last, make sure you leave the mommy with a set of thank-you cards. These are a pocket-style card, stamped thanks but they can be monogrammed with a stamp or on the computer. Instead of purchasing cards, you can make your own inexpensive ones by using textured cardstock and scrapbook paper. Each guest can self-address the envelope for mom so all she has to do is fill out the card! Got any great tips? Leave 'em here!