Friday, July 20, 2012

Art for your Walls!

 Hey there scrappy chicks!  Wanted to introduce to you my new line of home decor wall art.  


I am growing to love mixed media art....and with these altered printers trays, I get to combine my love for scrapbooking, paper crafting and altered art!  


They come in a variety of styles and finishes; once decorated, they can be left as is, or for you cropping fans...they can be dolled up with your personal photos.  They have oh so many uses, like collecting and displaying mementos from a trip, storing artist trading cards, a way to display your favorite chatzkies or maybe creating one to hold your baby's keepsakes or making one to give as a housewarming gift (people still do that don't they?)!  
 Buttons, buttons and more buttons oh my!

Wouldn't this be too cute in baby's room?

With photos added :)

Have you altered a tray?  Leave your link so I can check it out!  

Sunday, July 15, 2012

Cupcakes for my Chocoholic Hubby!

Hey sweet friends!  Got an extra yummy recipe for you from my "go-to" cupcake book, "Cupcakes" by Susanna Tee.   We celebrated hubby's birthday the other night, and I wanted to come up with an extra special treat for him but that is no easy task.  He loves his chocolate, and I mean he's a chocolate cake and chocolate chocolate chip ice-cream kinda guy...so I decided on these devil's food cake ones with chocolate frosting.  To make them look extra cute, I layered them in some mason jars, with frosting in between and sprinkled some chocolate chips on top...so divine!  Hubby was quite pleased, so mission accomplished!


Here's the recipe with my substitutions in parentheses:


Makes 18 cupcakes 
3 1/2 tbsp soft margarine (or butter)
generous 1/2 cup firmly packed brown sugar (I used organic maple)
2 large eggs
generous 3/4 cup all purpose flour (I used unbleached)
1/2 tsp baking soda
generous 1/4 cup unsweetened cocoa
1/2 cup sour cream (I used plain greek yogurt)

Frosting
4 1/2 oz semisweet chocolate (I used Trader Joe's chocolate chips)
2 tbsp superfine sugar (organic maple)
2/3 cup sour cream (greek yogurt)

-Preheat oven to 350 degrees.  You can use 18 paper baking cases in a muffin pan or I used coconut oil to grease muffin pan since I planned to put cupcakes in the mason jars.

-Put the margarine, sugar, eggs, flour, baking soda, and cocoa n a large bowl and, using an electric hand whish, beat together until just smooth.  Using a metal spoon, fold in the sour cream.  Spoon the batter into the paper cases or muffin tin.

-Bake the cupcakes in the preheated oven for 20 minutes, or until well risen and firm to the touch.  Transfer to a wire rack to cool.

-To make the frosting, melt your chocolate in a heat proof bowl (I melted mine in the microwave for 1 minute at 70 percent power, stirred and then for an additional 30 seconds at 70 percent power).  Remove from the heat and let cool slightly, then whisk in the sugar and sour cream until combined.  To put in the mason jars, it's less messy to put one plain cupcake in the bottom, then frost, layer another cupcake on top and spread frosting over the top.  You can set in the refrigerator before serving.  Serve decorated with left-over chocolate chips.


Disclaimer: I am in no way affiliated with the author or publisher of the "Cupcakes" book!

Thursday, February 9, 2012

Birthday for Baby Spice


My sweet girl turned three last month and we hosted a small birthday dinner for her...ordinarily I don't do full-blown birthday decor, unless it's a P-A-R-T-Y. But Miss Thang had it in her mind she wanted cute party hats (perhaps she saw them while I was on Pinterest?) and for those who know me, I just couldn't leave it at that. Especially when I came across this post on Ruffles and Stuff's fab blog, about doing party decor for free with scrapbooking materials. And as we all know from previous posts, I have PLENTY of those around :)


For the hats, I took an old store bought one I had (yes, I hoard like any good crafter), took it apart and used it as a template. I added the ribbon trim while the girls' hats were still flat --I used hot glue instead of sewing...but the ruffles look good, right?
Baby Spice got in on the dessert-making (no surprises here!)

We're a cupcake kinda family, so this year we decided to try cupcakes in a jar, and yes, the yellow cupcakes and Raspberry lemon frosting were homemade! See this post here for the recipe. They were delish!

I had been itching to make some of these as well...yes, more scrapbook paper! They were the perfect wall, well, mirror decor and you can reuse them or hang them in your child's room. Now, how's that for crafting on a budget?
Posted by Picasa

Wednesday, February 1, 2012

Pinterest Challenge Giveaway Winner


We finally have a winner for the Pinterest Valentine's Day Challenge Giveaway!  Boy, did it come down to the wire or what???  Two of my FB fans hung in there for dear life, and the right guess came in on the last day! Congrats to Kathleen Heltzer for guessing the winning project, "So Pretty!"  Paula, from Scrap Your World sure gave her a run for the $$$!!  Thanks to all who entered.  Kathleen, please email me at cinnamonspice7 {at} gmail dot com to claim your gift.   

You will be receiving this lovely felt-rosette wreath!  The original wreath was pinned by theidearoom.net.


Now for Part II...I need you, my lovely readers to head over to the EtsyMom FB page HERE and check out all the lovely Pinterest-inspired Valentine's Day projects and vote on your favorite, EVEN if it's not MINE!  They should be posted by tomorrow, Feb 2nd.  You can visit my Pinterest Board here to see the original wreath, {it's a pretty full board, so scroll all the way to the bottom!}. Remember, we all created something outside our normal niche!

Happy voting!


Wednesday, January 18, 2012

{Giveaway} with a Twist!!!

Are you ready for a fun little giveaway based on one of the hottest Internet past times?  Yep, you guessed it...this giveaway is all about Pinterest!  I'm participating in a Valentine's Day Pinterest Challenge sponsored by EtsyMoms...I have to choose a V-Day inspired project to complete and give as a gift.  Here's the catch, it has to be a non-papercraft...

Oh my stars, what have I gotten myself into???  

Soooo, where do YOU come in?  I've created an "Oh My Sweet Valentine" inspiration board here...all you need to do is guess which craft I'm going to make.  The first one to correctly guess what I'm making will win the gift!  No kidding, I really am going to make it for one of you :)

The RULES:

  • You must be a fan of my Facebook page here to enter.
  • Comments should be entered on my FB page, along with your email addy so I can contact the winner.
  • To describe the pin you've chosen, use my comment for that pin, ie "Cute font ;)".
  • 1 guess per day, so think carefully, but don't take too long!!
  • Giveaway will end once the First person correctly guesses the item I'm going to make.
Good Luck...maybe you'll catch a little inspiration for your Valentine's Day projects!!!

Friday, January 13, 2012

2012, the Road Ahead


Welcome 2012!!!  

My family and I closed out last year with a 2-week trip to my folks' place in St. Louis...after it took us nearly 3 days to drive back, hubby has declared no more winter road trips to my hometown!  

During the many hours on the road, I had lots of time to reflect on my creative business, what I've accomplished and where I want to go this year.  I'm not one for New Year's resolutions, but I believe wholeheartedly in 
setting goals, personal and business, with a DATE attached, don't you?

SO I want to share mine with you!  It will help keep me accountable and might inspire you as well ;)

This year, I am going to:
  • Make better use of free business coaching resources (Ongoing). I started by attending Laura Roeder's Facebook Divide Webinar yesterday.  If you want some usable tips on untangling your business from your personal page, check it out here!
  • Design a newsletter, develop a subscription list and decide the content and how often it will go out  (Jan 30).
  • Overhaul my blog--I have changed the content a few times and need to decide on the exact direction I want it to go!  (Feb 29).
  • Work on my branding, to include a possible name change, new logo and shop banner (Mar 31).
  • Organize my craft room/studio--I need to carve out time to focus on getting this room set up so that I can be productive--tough because we moved last year and my space is much smaller, AND I'm still digging things out of boxes (May 31).
  • Launch my own website! (Oct 30).
  • Increase my sales by 50% -- I am launching a new, higher priced product line which is more cost- and time-effective to help achieve this.
  • Do 4 quality craft shows (Dec 18).

I would love to read what YOU want to accomplish this year and what steps you'll take to get there, so feel free to share ;)

Friday, November 25, 2011

SALE!!! Limited Time Only


Now's your chance to stock up on winter gifts and stocking stuffers for family, friends and teachers!  I'm offering 20% off  my entire store here, yep, on everything!  Just enter coupon code EM20OFF at checkout. But hurry, offer expires Nov 28th (midnight EST).

xoxo,
Kimberly

Wednesday, October 19, 2011

I Love Mistakes!!!

Me loving mistakes has not always been the case!!!  And I certainly wouldn't have blogged about them because "Oh My Stars, how would that look???"  Before opening my Etsy shop a few years ago, I would definitely say I tended to be a bit of a perfectionista (I made a new word).  While that worked well in my previous line of work, it was holding me back in my scrapbooking and paper crafting endeavors.  Isn't that ironic considering the coolest thing about scrapbooking is the ability to cover up almost ANY uh-oh you've made???  I read somewhere on Etsy, maybe the forums, a while back that a true artist knows which mistakes to keep and which ones to abandon and now I GET IT!

Some of you might have seen this cute little album cover (below left) on my FB page  the other day...well, I thought a little speck of something had become lodged underneath the vellum so while oh-so-carefully trying to get it out, I actually tore the vellum--YIKES!  I fretted for a moment and thought, well I could just keep it, and then I thought, no way mama, you are not giving up on this one, so I just transformed it (picture on the right)!

                                                        And I like it so much better now.

So, my tip to you is don't be afraid of making mistakes, they can actually be a way of redirecting your creativity.


Wednesday, October 12, 2011

Get Your Craft Fair Prep On!


Fall and Holiday craft season is here!  I've done several small fairs over the past couple of years, and each time I try to note what I should do for more success in the future...figuring out what/how much to sell was probably the biggest pain in the "bucket" when I was just getting my feet wet.  I finally decided to...

Make what I love and find the right fairs for what I offer!


If you have time, do some research online (a simple Google search for "craft fairs" and your zip code, or try Craigslist, Eventlister, local schools or churches) and visit/ask other vendors about shows before you apply.  I've gotten excited about fairs in the past, only to find they were not well advertised, not well attended and I barely broke even!  Let's be real...you invest far too much time and talent; be selective when you can!


Probably the most important things you need to consider in advance, if you want to make a decent profit, are your target dollar figure and how much inventory you need to sell in order to reach that (minus supplies and materials, signage, booth fee, etc.).  Then consider that at a well-attended show you might only sell 1/3 to 1/4 of your inventory... that should give you an idea of just how much you'll need to create!  Try to find out in advance how many shoppers have attended in the past; if the numbers are low, carefully consider how much time you want to put into making new things...unless you have another avenue for selling them soon after.  Offer different price points... I came up with a few different, lower-priced items that I could have on hand in larger quantities, in addition to my more involved, and expensive pieces of work and they sold really well.

Remember, shoppers will want to see and feel your items, be sure anything too fragile for handling is well protected.  Place your more delicate scrapbooks up out of the reach of little hands and instead have something for them, like bookmarks or notepads.  For cards and tags or other smaller items, I use clear resealable bags and a bag topper I print onto cardstock.

Print your logo onto a small clear label or sticker paper and use a circle punch for adding directly to the back of your greeting cards (enlist a child, husband or friend to help).  Business Cards with a punched hole can also be tied to bags and larger items. If you offer a variety of items, display like items together, say all of your gift tags in a basket, all of your notebooks in another, cards together etc.


**Make sure your prices are visible**
    Having signs with prices for similar items  helps avoid tagging each item and SAVES TIME!
If possible, set up your booth in advanceeither in your yard, or wherever you have space (I used my living room) and take pictures to facilitate quick set-up at your event.

Be creative with your booth, after all, it's HOW your booth looks that will draw people to your display. Put time and effort into exhibiting your work, it will pay off!  Try to choose simple containers like baskets, boxes, shelving, similar in style and preferably color, so they don't overshadow your display!

Use on-hand items like boxes hidden under your tablecloth to create "risers" or height on your table.  Create your own bunting banner, Check out Etsy for great banners, or take advantage of free offers from Internet marketing companies.


Check out my Pinterest board here for some artful display ideas.  Other ideas to keep your display fresh are having a featured product spot and rotating a few different items; or having a drawing to attract people to your booth, it could be for something as simple as signing up for a newsletter to enter!
If you need more help with your displaysearch "craft fair display " on flickr for inspiration!   Paper Crafters might want to add "cards" to your query.
To ensure things run smoothly the day of your event,  have a list of the items you will be selling, have receipts available for your record-keeping and in case the customer asks you for one.  Office supply stores sell pre-printed receipt booklets that work well.   Accept credit cards if you canthere are a number of services available, like Square (squareup.com) and Propay.  Square sends you a card reader which you can connect to your cellphone (check to see that it is compatible with yours) and a fee is charged for each transaction.  Secure your money and keep it out of site with something like a small lock box (also available at office supply stores).

 Shows can last all day and use up a lot of energy, so bring along Snacks,  a Photo Album to display custom work, a Friend (for potty breaks), and EXTRA BUSINESS CARDS!!! Preserve your sanity...If you feel overwhelmed, ask for help!  Even non-crafty friends will want to help you succeed!!  


Don't be afraid to mingle, some of my best customers have been other vendors at shows.  That being said, when just starting out, I went to SELL and not buy!  Remember to take pictures at the show, SMILE and ENJOY yourself...it's fun making $$$!!

My post focused on a lot of nuts and bolts...here are links to some other extremely helpful tips from an Etsy Seller RockLove here who does HUGE shows! and more on Etsy's blog here.  And oh yeah, I'm not sponsored by any of the companies mentioned!

Sunday, October 9, 2011

Are You Challenging Yourself?

Are you stuck in a creative rut?  Keep doing the same things the same way but wanting to try something different?  When I feel that way, I look for ways to help me grow artistically, like this fun event:


Participants chose from one of three color palettes and created an item using primarily those colors. Sounds easy right? Well, it turned out to be downright tricky!!! BUT, I love the way challenges stretch my creativity.

From the available color choices on the left,  I chose the palette on the right:

cedar green, bamboo, and chocolate liquer.

 I knew I had some yummy My Mind's Eye Papers left over from a custom order that would be perfect!!!


And here's the finished item; a MINI ALBUM, of course! But so much more!


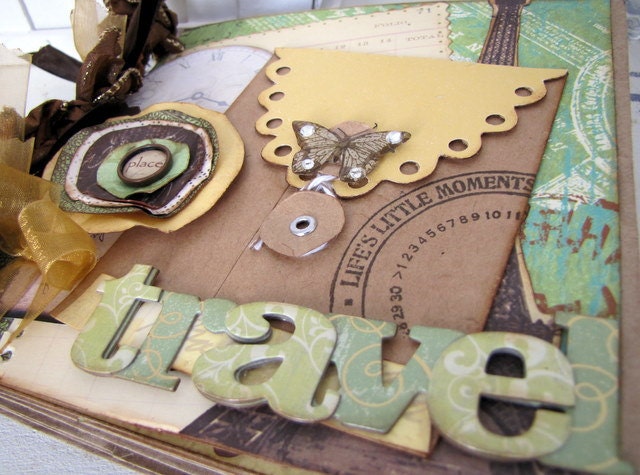
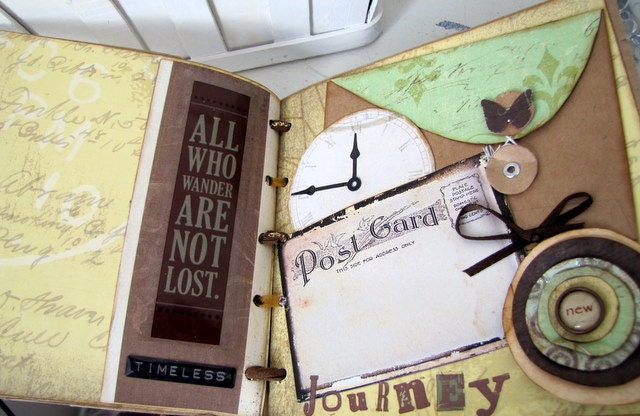
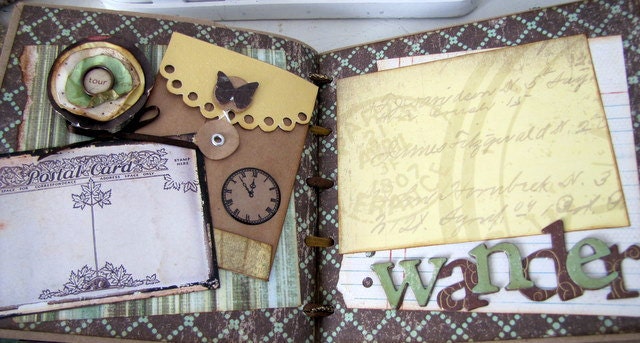
My love of travel inspired this journal/album as a place not only for pictures but also for preserving mementos from travels, like ticket stubs, programs, whatever you'd like to hold onto to remind you of your trip. I also decided not to go with so many traditional "photo mats", opting instead to have "background" area for your photos which would leave more flexibility for placing your photos.


Tons of handcrafted embellishments like cardstock clocks upcycled from sticker packaging, usable kraft colored envelopes and handcut paper posies make the book extra chunky!


How well did I match up the colors?  YOU be the judge :)  Voting starts  at 8 AM, TOMORROW, Oct 10th -14th on http://www.etsymom.com/, so be sure to stop by and PLACE YOUR VOTE for your favorite!

Monday, September 19, 2011

Sneak Peek!

The shop has been closed during our move but will be reopening soon! I'll be sharing sneak peeks of some of the new items you'll see.

Here's a fun little "Teen Diva" mini album or journal.

More previews to come!


Posted by Picasa

Thursday, September 15, 2011

A New Home, New Routine But Same Sweet Style!


Did I mention I was moving over the summer? Probably not because this move seemed to
CONSUME all my time!

But that's done now and we are happily settling into our new house back home, if that makes sense!!!

After 4 years in North Carolina, we have finally made it back home to Northern Virginia. Still unpacking but this mama needed to get back to creating; I think it helps keep me balanced!

Here are some of my latest cards, ready to be shipped off to Divine Designs by Nancy in Sanford, NC.

How was YOUR summer?


Posted by Picasa

Wednesday, June 22, 2011

I Love Spring Giveway Winner


And the winner of the "I Love Spring" 500 fan Giveaway is.....
Robin Ridpath Uppercase Living Independent Demonstrator!!!!!

Posted by Picasa


Robin chose the cute little "All Bark" paperbag album. Please email your contact info to cinnamonspice7 {at} gmail dot com today to claim your prize. Thank you to all those who participated; your support and feedback are invaluable!


Friday, April 8, 2011

{Giveaway Time!!}

Happy Friday!!! I am well on my way to 500 fans on Facebook! 

 To show how much I appreciate all the support, encouragement and feedback

you've showered me with over the past few months, I am giving away a custom, 10-page paperbag scrapbook album. The winner chooses a style from the picture collage below. To enter, visit my Facebook page here and leave a comment on which style of album you'd like to have.

That's it, easy-peasy.

Spread the word, the quicker I hit 500 fans, the closer you are to winning the sweet prize!!!


Monday, March 21, 2011

Some Bunny Loves You!


As part of decluttering my craft room; I've challenged myself to use up the materials I have on hand. I wanted to create something for Easter and was inspired by the colors in a set of "Bo Bunny" stickers to make this "Some Bunny Loves You" paper bag album kit!
Hope you like it!


I've been working on making my own embellishments...the cover page is all handcrafted, except for the Prima flowers.


More handcrafted accents: chocolate and white bunnies, "decorated" eggs and mini page titles!

I love these papers by K&Company; I have used them for so many projects and the shades of brown, green, blue, teal and even pink were just right for this project.


Add photos and what a SWEET little book to hold your Easter memories!
Thanks for stopping by!
Posted by Picasa

Monday, March 14, 2011

Faces of Love ~ Crinkled Posy Tutorial

I am so excited

that I finally have time to focus on finishing up this custom 20-page album I've been working on and wanted to share some progress pics. You might remember this little BEAUTY from some earlier layouts, my friend's darling little Grace! I just have to add a few finishing touches like some more bUtTeRfLiEs and the JoUrNaLiNg.

I love the way the posies turned out, they are so easy to make! I use circle and scallop punches, or you can use your Cricut, in varying sizes. I spritz them with water (not too much or the paper will tear); crumple them up and then uncrumple them to dry. Once they are dry, you can ink the edges and the creases if you like. Stack them up and secure with a brad or stitch a button to hold them together. Add stems or leave them as they are!

Posted by Picasa


What's projects have you excited these days?

Sunday, February 27, 2011

Cupcake Love

I mentioned awhile back on my Facebook page that I was ready to take the digital scrapping plunge! I guess instead of plunging I am dipping my toes in; testing things out 

because I still love the texture and feel of PAPER

So, I have been dabbling with hybrid projects like this stash of custom cupcake notepad/pen sets I recently created...what sweet gifts!


This was such a fun order to design...you know how Mama loves Cupcakes! The client asked for something girly, with a damask print and this is what I came up with. The damask paper was printed on textured white cardstock from digital paper over at Cupcake Cutiees Designs...love her stuff!I remember the cute felt cupcake diecuts that I've had in my stash for a few years now...yes, that long!  This was the perfect project to use them on and topped with a flower for a little vintage flair!

 Thanks for stopping by!

Thursday, February 24, 2011

4 Boxes, 15 Minutes a Day!

I know you've been waiting to see how my plan (see plan details here
is taking shape...I'm happy to report that 

4 boxes and 15 minutes a day 

have actually EMPOWERED ME to take charge and organize my craft room! Thanks to an awesome tip by my Aunt Jean, I spent my 2nd 15 minutes looking for suitable boxes and labeling them "Trash", "Recycle", "Keep" and "Another Room". The Trash box is for just that, items I don't want and that can't be recyled. In the Recyle box, I'm putting reuseable materials like old shipping boxes (these can be used to ship some of my etsy items) and one-sided printed paper the kids can use the blank side to color on. This morning, I almost filled the trash and another room boxes, so I am making progress and actually EXCITED about it!  Those feelings of being overwhelmed and frustrated, and quite honestly of being an organization failure, are gone!

What can YOU do with 4 boxes and 15 minutes?